Thursday, June 13, 2013

Game of Thrones Drawing Tutorial


After the tragic conclusion of season three of Game of Thrones, I wanted to try a pencil drawing of Daenerys Targaryen.  Mind you, I haven't done any graphite pencil drawings since college so the thought was somewhat daunting. Fortunately, once I had my sketch down it all came back to me!

I started off by drawing a light sketch. Try not to make your lines too dark, we will use sharp and soft edges to build the shape.

Once the sketch was down, use a darker grade pencil to start enhancing your dark areas.

Starting to look like a face!  Look to your reference photo and notice the really dark areas. If you build the dark areas you will be able to blend out and create the softer/lighter areas. Look at the nose, see how we can start to create shape by blending the darks?


When you are ready to blend, a tortillon tool is best.  It's basically tightly rolled paper that allows you "push"the graphite around to create that blended look.


As you blend, you may find some of your dark areas have lost some of their depth. Don't be afraid to go back in with a darker pencil to continue to build the levels!

Woof, time to start with the hair.  Drawing/painting hair has been an evil nemesis of mine since I first started portraits.  I started with wavy lines and used varying depths of shading to create the flowing appearance.
 I found that is was easier to add the background at this point so I could use it to show the dimension between the head and the background.
When adding the dark pencil for the shirt, I went back in with an eraser to add highlights.  Once you have your highlights, you can enhance them by using a darker pencil around the highlight. Adding a part in the hair made a huge difference!


For the final touch, I went in with my eraser and erased some fine lines to add texture and highlight to the hair, and Viola!
Have fun!

M.

Tuesday, April 16, 2013

Liebster Award


(Meghan at Make Something Daily gets credit for making this fantastic animated award image).


Last week, Sharon at Desert Willow Lanegave me a Liebster Award! Julia from  It's Always Reutten explains that "The Liebster Award is given from one up-and-coming blogger to other up-and-coming bloggers in an effort to support and recognize bloggers with less than 200 followers. Liebster is a German term of endearment; so we are expressing our support for one another through this award." So here we go!

The Rules:
Each blogger needs to:
1. Post 11 random facts about themselves;
2. Answer the 11 questions set out by the person who gave you the award;
3. Choose 11 new bloggers to give the award to and link to them in your post;
4. Create 11 new questions for the newly awarded bloggers to answer;
5. Comment on each newly awarded bloggers blog to let them know about the award; and
6. You cannot tag back the person who awarded you the Liebster Award!


11 Random Facts About Me!

1. I love raw oysters. 
2. I work the night shift as a registered nurse.
3. My cat and dog are like my babies.
4. I speak Spanish and I am learning Swedish.
5. I have an unhealthy obsession with black olives...they are like Pringles...once I start I can't stop.
6. I met my husband in art history class in college. 
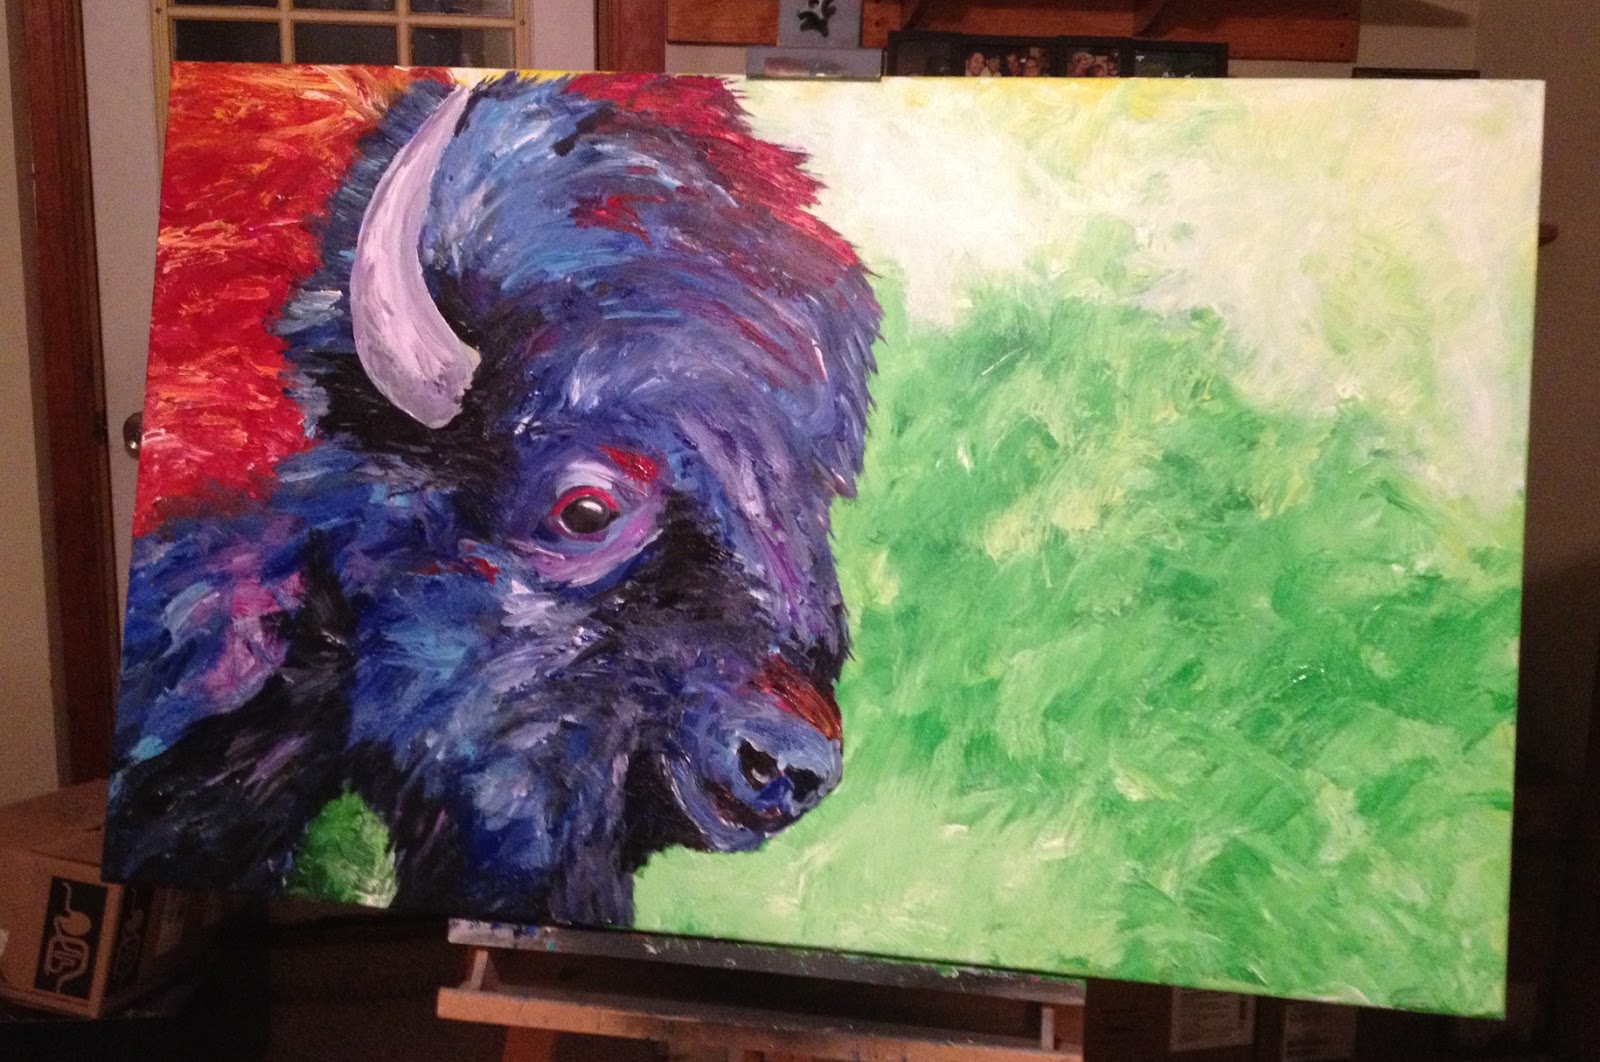
7. I have dozens of unfinished paintings. I am notorious for not finishing art projects.
8. I have tendency to be indecisive, as demonstrated by my two, unrelated, bachelors degrees (one in Psychology and one in Nursing).
9. I really, really like airports. 
10. I refuse to spend more than $20 on a pair of shoes.
11. 

My Answers to Sharon's Questions:

1. What were your top three favorite cartoons when you were little, and do you still watch any of them? 
   1) Classic Disney cartoons (Mickey, Chip & Dale, etc.  2) Tom & Jerry 3) Daria
2. What's your favorite type of food? (Mexican, Italian, Chinese?)
     Mexican/Central American. Not the imitation stuff. The real, Pico de gallo smothered, black bean, and corn tortilla stuff.
3. Cake or raised donuts?
   Cake.
4. What inspired you to start your blog?
     I have always loved making art. I would have people ask me about my style and process of painting. Initially, I thought the blog would only be for painting tutorials.  I quickly realized that I make all kinds of art and crafts and that my paintings often take a long time to complete.
5. What do you love most about blogging?
   I love reliving the creative process when I write about making art. By going through the tutorial process, I often find ways that I could improve the process and relive the things that worked!
6. What do you love least about blogging?
   Sometimes my art is very impulsive and I work so quickly that photographing the process is counterproductive. Then when I finish I think "this would have been perfect to blog about!"
7. What's your idea of the perfect day?
    Enjoying a hot cup of black coffee out on my deck. Spending a relaxing day with my husband and taking our dog for a hike in the woods. Coming home and slapping some paint on a canvas. Having a home-cooked meal and a glass of wine. 
8. If you could change just one thing about yourself what would it be?
  I am a "visual person". I struggle to comprehend new ideas/suggestions unless I can see them in front of me. Needless to say I do a lot of sketching and I am constantly asking my designer husband to "photoshop" something so I can see it.
9. What's your best attribute?
   I am compassionate in nature. I love being a nurse because I truly love helping people in the healing process.
10. Which blogger inspires you most, and why?
   I am drawn to bloggers that are raw, honest, and creative. One of my favorite bloggers is Jen from iHeart Organizing. Jen has amazing organizational tips, projects, and printables. I love that Jen is not afraid to admit that she is not an expert in all that she blogs about. Her honesty about her trials and errors help her readers say "hey! I can totally do this!"
11. If you won the lottery what's the first thing you would do and would you keep blogging?
  After paying off some bills and paying down the mortgage, I would immediately book a world-wide trip. 


Drum roll please!
The Liebster Goes to...

Megann from Megann's Kitchen
Megan from Lydia's Corner
Laurence from Storage/Glee
Candice & Vanessa from When Decades Collide
Jen from Cameron & Co.
Cathlin from A First Grade Journey
Julie from Where We Are
Anglea from Diary of a Chair

My Questions for the Winners!

1. What is the one food item you could never live without?
2. If you were given a shopping cart to fill for free at your local Arts & Crafts store what items would you grab first?
3. What do you enjoy most about blogging?
4. Dogs or cats?
5. What is your dream vacation spot?
6. What skill do you have that you are most proud of? 
7. If given $1000 to be used towards your blog, how would you spend it?
8. If you could be any Disney character, who would you be?
9. What color do you use most in your home?
10. When buying furniture, do you prefer New, Vintage, or a mix?
11. Pepsi or Coke?

I really hope you check out the Liebster Award Winners and show your support!

-Molly


Thursday, April 4, 2013

Marion Rose Inspired Buffalo Painting


When my husband said he wanted a painting of a buffalo to put over our fireplace, I couldn't wait to get my brushes out and start painting!

We LOVE the "Bison Head Color Study III" painting by Marion Rose, so I decided I would try to replicate it.  If you are not already familiar with Marion Rose's art, please explore her site and let yourself get swept away in the amazing colors.  She was a master of bold, bright, and colorful pieces of American art.  Unfortunately, Marion Rose died in 2011.  Her art is a constant inspiration for me, so replicating one of her pieces was very special.

First grab some bright Acrylic paints and some large brushes.  I actually used a stain brush from Home Depot and found that I was able to create the best texture with this large type of brush.  I did use smaller brushes for the eye, horn, and some other highlight areas.  I wanted this painting to be massive, so I waited until I had a 40% off coupon at Michaels and bought a 36"x48" wrapped gallery canvas.


 Once I had a sketch down, I started with the background. Start by slapping, yes literally slap, the paint onto the canvas. Then alternate your brush strokes to create a textured/chunky appearance.

Now for the fun part! Building the Buffalo head took a lot of layers to create the depth, shadows, and contours.  Make sure to stop and wash your brushes every so often so your paints don't get muddy.

Don't be afraid to use black paint to really create your shadowed areas. You will be amazed how the layers will "pop" when the bright colors are bordered by darks.


I have always found eyes to be incredibly stressful.  They really help to bring emotion to your piece, so take your time! By adding a simple white highlight, you can create shape and realism to your eye.

 Before I put the brushes down, I went back with some bright colors to add last minute highlights.

This little Buffalo has a new home in our living room! I just love him, although next time I'll go bigger!


M. 

Wednesday, March 6, 2013

Monogrammed Door Decor


Want to create a personalized letter for your front door? Or make a lovely wedding gift for a couple that will finally share a last initial?  The possibilities for this Yarn Wrapped Letter are endless!

You'll need:

Wooden letter - available at most craft stores
Yarn - I used two different rolls of complimentary colors, one solid, one striped
Acrylic paint that matches your color scheme
Hot Glue Gun
Tape
Decorative Do-Dads


 Before I started with the yarn I painted the letter in a light green just incase the yarn couldn't cover all the corners.  (You will note that for a quick paint job, I don't bother using a palette that I'll have to wash)

Take an end piece of yarn and tape it as close as possible to the edge of the letter. The tape will help hold the end in place until you have wrapped it.

If you will be alternating yarn rolls, you will want to wrap a section and stop. If you are only using one color you simply continue to wrap until the letter is covered. You may have to go back over some parts, especially if you have a funny shaped letter, like a G.

If you are alternating yarns, wrap a few sections of one color and then go back and wrap with the next yarn roll.

 The corners and curves can be tricky! For this curve I wrapped in a V pattern, alternating from side to side so that it almost made a braid.  Once a section was wrapped, I put a small dollop of hot glue to hold the yarn in place.
**HINT: If you plan to put your letter on a door that gets a lot of sun, take a piece of scotch tape and stick it over the drop of glue, this will prevent the glue from heating up and sticking to your door!


 Once you have your letter wrapped, get out your decorative pieces and start playing around with the placement. Remember that this will be hanging so try to keep the weight balanced so your letter isn't crooked. Once you have settled on an arrangement it is helpful to take a quick photo.  You will have to take the pieces off so that you can glue them down in the appropriate layers, so having a photo of the intended arrangement can be helpful!
Once your pieces are glued, tie a small bow around the top section of your letter so you can hang it from a hook. If you have a letter that does not have a centered top (Y, U, I, L) you might find that attaching a hook on the back of the letter is the easiest. 


Hope you love it!

M.

Monday, February 25, 2013

Painting the Blue-Grey Tanager


When I started working on my pieces for the 12x12 Art Show & Silent Auction, I knew I wanted to paint a Nicaraguan bird.  Luckily, Nicaragua is home to 698 different bird species!  I decided on a Blue-Grey Tanager, which is found throughout Central America.  In a previous post that explains this charity art show I had promised a tutorial for this piece, here it is! You can read more about this charity art show on my Hope Comes in Color Post.

I used oil paint for this piece so that I was able to layer paint and create a "feathered" look.   I started by sketching a basic outline of the bird.
The next step is to go in with your dark paints and start to build the contours and crevices.  Now you might be saying "wait, I thought this was a blue bird?". That is the beauty of painting with oils! By starting with these dark colors we are going to build layers that add depth and shadows.
If you are using a reference photo, make note of the darkest areas.  Think of your painting as a "color by number".  Don't be afraid if your painting looks too dark, we will lighten it later. You will have to let this layer dry before going in with your blue paints. Oil paint takes much longer to dry than acrylic, it might take a few days before you are ready to paint again.
Once your base layer is dry it's time to add your primary color layers.  Because oil paint is transparent, you will find that your dark areas stay dark! Again, think of the color by numbers, use darker blue for the areas of contour, and lighter colors for highlights.
 For the branch, I alternated long and short brush strokes and different browns, black, and white paint.
 Our little bird is starting to look like a Tanager!
I knew I wanted a basic background.  I chose a green wash.  By mixing green and white on your palette and adding some turpentine, your paint will "wash" onto the canvas.
I continued to go back and add highlights in white.  One of the most drastic highlights you can add is a simple dot of white in the eye. You will be amazed how much life it brings to your piece!
 Close up of the face


Hope you enjoyed this tutorial! I would love any feedback!

M.  

Thursday, February 21, 2013

Charming DIY Bedside Table


I was in desperate need of a new bedside table after we rearranged our bedroom.  After looking briefly in a few different shops, I decided to look one more place...my parents basement.  I managed to find this beauty buried under some old boxes.
I'm pretty sure this table has been painted every color you can fit on a palette.  The height was prefect for next to the bed, and I loved the little drawer.  The next step was to head to Home Depot and grab some supplies!
 I grabbed a quart of Behr "Vintage Chic" paint in "Ozone" in a matte finish.  Then found this awesome crackle paint by Martha Stewart.  The color of the crackle paint is called "Oat".
  First I gave the table a light sanding to get rid of some of the old paint layers.  Then I painted the body of the table the Ozone blue.
  The crackle paint tells you to use a Putty knife to apply the paint to your surface.  This was much harder than I expected and found that I couldn't apply evenly with the putty knife.  I found it easier to use the putty knife to apply a thick layer of paint and then use a brush to smooth it on the surface.  The instructions say the thicker the coat, the larger the cracks. I thought I caked it on pretty thick, but my cracks were still pretty small.  I used the crackle paint on the drawer face and the table top.


The crackle paint gave this table the perfect amount of vintage chic.  Made complete with design magazines, a creepy wooden cat, and an Ikea lamp, this table is perfect!

M.  
Related Posts Plugin for WordPress, Blogger...